Bags & Pouches · Bench lead · 14 Bench hours · 3 min read
A Boxed Dopp Kit: Five Panels, Four Corners, Two Hands
A dopp kit is the first order where you build a three-dimensional object rather than a folded one. That means the corners — four of them on the base and four where the end walls meet the sides. Get the corner stitch sequence wrong and the bag will not sit flat; get it right and the whole thing stands up on its own. Fourteen hours, five panels, and roughly 1,400 stitches.
Materials
- Veg-tan cowhide4/5 oz, 0.19 m²
- Lining2.5/3 oz, 0.16 m²
- Brass zip#5, 250 mm, open end
- Waxed thread0.6 mm dark brown, about 22 m
Tools
- Pricking irons3.85 mm, 2 + 8 tooth
- Stitching ponyessential for the boxed corners
- Zip foot or zip punch3 mm for the zip stitch line
- Corner chiseloptional, for the end walls
Bench hours
- 14 hBench lead
- 3.85 mmStitch pitch
- 0.6 mm waxed polyester, dark brownThread
- Vegetable-tanned cowhide, 4/5 oz body with a 2.5/3 oz liningHide
- 4/5 oz body (1.6–2.0 mm), 2.5/3 oz lining (1.0 mm)Thickness
- Hardware
- 4 parts
- Cut list
- 5 pieces
- Published
- 2026-10-14
- Stitch pitch
- 3.85 mm
Cut list Hole array drawn from the spacing in the spec table; dimensions in millimetres.
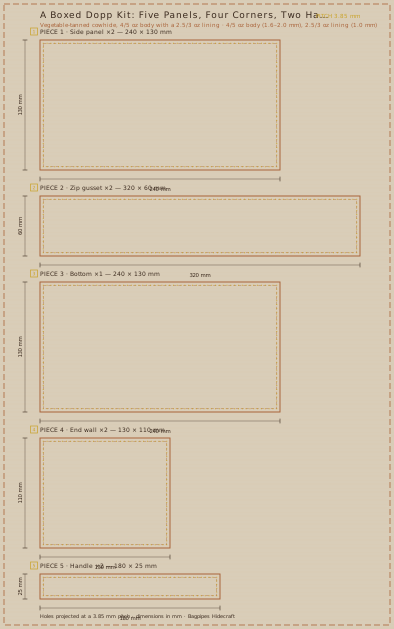
| Piece | Size (mm) | Qty |
|---|---|---|
| Side panel | 240 × 130 mm | ×2 |
| Zip gusset | 320 × 60 mm | ×2 |
| Bottom | 240 × 130 mm | ×1 |
| End wall | 130 × 110 mm | ×2 |
| Handle | 180 × 25 mm | ×2 |
Bench sequence 3.85 mm · 0.6 mm waxed polyester, dark brown
Cut the box, then cut the corners
The bag is 240 mm long, 130 mm wide and 110 mm deep. Two side panels at 240 × 130 mm, one bottom at 240 × 130 mm, two end walls at 130 × 110 mm. Before anything is stitched, cut 30 × 30 mm squares out of all four corners of the bottom panel and fold the resulting flaps up — those are your corner seams.
Mark the 30 mm corner with a square and cut it with a fresh blade in one pass. A corner that has been nibbled at with two cuts ends up 1 mm out and the bag will rock. Then skive the 8 mm band on either side of every corner seam from 1.8 mm down to 1.0 mm, because four layers of 4/5 oz at a corner is 7 mm of leather and nothing good happens at 7 mm.
Line as you build, never at the end
Each panel is bonded to its lining before any panel meets another. Contact cement on both faces, ten minutes to tack, then rolled from the centre outward. On a 240 mm panel work the roller in three zones — centre, then each end — so no air is trapped under the bond.
Cut every lining 3 mm smaller than its panel all around. The 3 mm gap is what stops the lining from fouling the corner seams once the panels are skived and folded. Lining cut to the same size as the panel will bulge out at every corner by the time you have four layers stacked.
Corners first, then the walls, then the zip
Stitch the four bottom corners first, working from the inside of the bag outward. Every one with a double row at 3.85 mm pitch, 4 mm in from the cut edge. Corners stitched after the walls go up are stitched blind, and blind corners on a lined bag are where the lining gets caught in the seam and the bag looks puckered from the outside.
Then the end walls to the sides, then the bottom to the sides. Finally the zip, which is the last thing to go in. Set the zip into the two 320 × 60 mm gussets first, then stitch the gussets to the side panels. A zip stitched directly into the bag body can only be replaced by cutting the bag open.
Handles, D-rings and the standing test
The two 180 × 25 mm handles fold over 25 mm brass D-rings and are riveted through the side panels with two rivets each. Do not stitch them only: a handle takes the entire weight of a loaded kit, and stitches in a 25 mm strap concentrate the load into two holes.
When the bag is finished, load it with 2 kg and stand it on a flat surface. All four bottom corners should touch. If it rocks, the corner skives were uneven — measure the depth of each corner seam with calipers and re-skive the deepest one. A dopp kit that rocks is a dopp kit that will not stand up in a bathroom cabinet.
Also filed under Bags & Pouches
Kit profiles
Adhesives
Adhesives: Contact Cement, Open Time and the Ventilation Rule
Contact cement is the strongest and the most misused adhesive on this bench.
- Rows filed
- 5
Blades
Cutting Tools: What Each Blade Is Actually For
Most bench injuries come from using the wrong blade on the wrong cut.
- Rows filed
- 5
-
- Rows filed
- 4