Workshop Gear · Working bench · 8 Bench hours · 3 min read
A Cross-Back Apron That Does Not Pull on the Neck
The neck loop is the reason most aprons get taken off by lunchtime. A cross-back apron moves that load onto the shoulder blades with two straps that run over the shoulders and cross behind, meeting the waist ties at the sides. It costs about two extra hours and two more rings. Eight hours, 0.42 m² of 4/5 oz, four pieces.
Materials
- Veg-tan cowhide4/5 oz, 0.42 m²
- Waxed thread0.8 mm natural, about 14 m
- Rings and snaps20 mm brass, cross-back hardware set
Tools
- Pricking irons4.0 mm, 2 + 6 tooth
- Strap cutterset to 25 mm
- Oval punch20 × 5 mm for the strap adjustment
- Stitching ponyfor the 660 mm side seams
Bench hours
- 8 hWorking bench
- 4 mmStitch pitch
- 0.8 mm waxed polyester, naturalThread
- Vegetable-tanned cowhide, 4/5 oz, unlinedHide
- 4/5 oz (1.6–2.0 mm)Thickness
- Hardware
- 4 parts
- Cut list
- 4 pieces
- Published
- 2026-11-05
- Stitch pitch
- 4 mm
Cut list Hole array drawn from the spacing in the spec table; dimensions in millimetres.
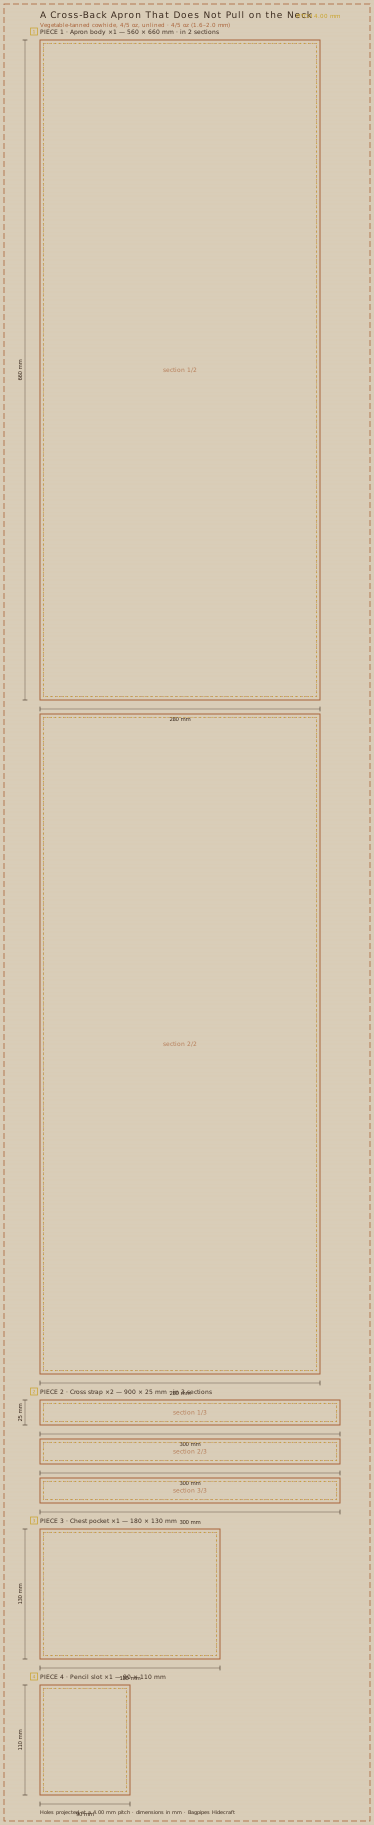
| Piece | Size (mm) | Qty |
|---|---|---|
| Apron body | 560 × 660 mm | ×1 |
| Cross strap | 900 × 25 mm | ×2 |
| Chest pocket | 180 × 130 mm | ×1 |
| Pencil slot | 90 × 110 mm | ×1 |
Bench sequence 4 mm · 0.8 mm waxed polyester, natural
Cut the body for the job, not for a photo
The body is 560 mm wide by 660 mm from the chest line to the hem, which puts the hem just below the knee on an average adult. A leather apron gets shorter with use, not longer: it softens and lifts at the shoulders, so cut it 30 mm longer than you think you need.
The chest line takes the two rings that the cross straps clip into. Set those rings 150 mm apart, centred, which is wide enough that the straps do not cross the collarbone and narrow enough that they do not slide off the shoulder when you reach forward.
The cross straps: two lengths, four rings
Each strap is 900 × 25 mm. One end has a Chicago screw that fastens to the chest ring, letting the strap rotate as you move; the other end passes through a rectangular ring at the waist and comes back on itself with a line snap. That snap is what makes the apron adjustable without unthreading anything.
Skive the last 120 mm of each strap down to 1.0 mm. It is not for looks — the strap end has to fold back through a rectangular ring and press against itself, and a 2.0 mm strap end folded on itself makes a 4 mm lump that digs in at the waist all day.
Pockets sized for the tools you actually carry
One 180 × 130 mm chest pocket, stitched on three sides, with the mouth 12 mm below the chest line. Inside it, a 90 × 110 mm pencil slot on the left side. The pocket holds a 150 mm steel rule or a folding rule; the slot holds two pencils and a scratch awl, which is the tool you reach for most and the one you lose most.
Sew the pocket with a 4.0 mm pitch and 5 mm in from the pocket edge rather than the usual 3 mm. On an apron the pocket gets dragged across a bench a dozen times a day and a 3 mm seam allowance frays out within a year. The wider margin is what keeps a leather apron a five-year object.
Edges and the first wear
Bevel all four sides of the body and burnish with gum. Leave the edges unpainted — an apron flexes in every direction and paint cracks at the waistband within six months. Then rivet each waist strap joint with two 9 mm rivets, place the apron on a person, and set the snap positions on the body, not on a table.
Adjust the two Chicago screws so the straps sit flat over the shoulder blades, then tighten them with a screwdriver and leave them. Most cross-back aprons are worn too loose, which puts the load back on the chest rings; the straps should be tight enough that the apron does not move when you bend to pick something up off the floor.
Also filed under Workshop Gear
Workshop Gear · 2026-09-24
A Chisel Roll: Fifteen Pockets, 420 mm Wide
Pricking irons are the most expensive tools most people own and the ones most often stored loose in a drawer.
- Bench hours
- 7 h
- Level
- Working bench
Bags & Pouches · 2026-11-01
A 360 mm Messenger Bag: The Gusset Is the Whole Job
Everyone plans the flap and then improvises the gusset.
- Bench hours
- 18 h
- Level
- Bench lead
Cases & Covers · 2026-10-21
A Wet-Moulded Half Case With a Tripod Boss
A half case has to do two things at once: hold the camera body tightly enough that it does not slide, and let the tripod socket through at exactly the right height.
- Bench hours
- 12 h
- Level
- Bench lead
Kit profiles
Care & Feed
Care and Feed: Less Often Than You Think
More leather is ruined by over-oiling than by neglect.
- Rows filed
- 5
Hides
Vegetable-Tanned or Chrome-Tanned: The Choice That Fixes Everything Else
Almost every technique on this bench assumes vegetable-tanned leather.
- Rows filed
- 4
Adhesives
Adhesives: Contact Cement, Open Time and the Ventilation Rule
Contact cement is the strongest and the most misused adhesive on this bench.
- Rows filed
- 5