Workshop Gear · Working bench · 7 Bench hours · 3 min read
A Chisel Roll: Fifteen Pockets, 420 mm Wide
Pricking irons are the most expensive tools most people own and the ones most often stored loose in a drawer. This roll holds fifteen chisels in individual pockets sized by tine count, rolls from the right so the flap covers the tips, and closes with a 480 mm tie strap. Seven hours, 0.14 m² of 6/7 oz shoulder, and about 6 m of stitching.
Materials
- Veg-tan shoulder6/7 oz, 0.14 m²
- Waxed polyester thread0.8 mm brown, about 12 m
- Studs and snapSam Browne studs plus line snap
Tools
- Pricking irons4.0 mm, 2 + 6 tooth
- Stitching ponyneeded for the 420 mm seams
- Round punch6 mm for the stud holes
- Creasing tooloptional, for the flap edge
Bench hours
- 7 hWorking bench
- 4 mmStitch pitch
- 0.8 mm waxed polyester, brownThread
- Vegetable-tanned cowhide, heavy shoulder, 6/7 ozHide
- 6/7 oz (2.4–2.8 mm)Thickness
- Hardware
- 3 parts
- Cut list
- 4 pieces
- Published
- 2026-09-24
- Stitch pitch
- 4 mm
Cut list Hole array drawn from the spacing in the spec table; dimensions in millimetres.
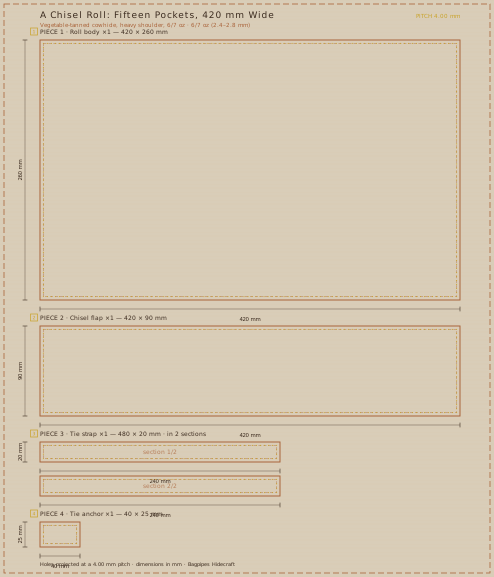
| Piece | Size (mm) | Qty |
|---|---|---|
| Roll body | 420 × 260 mm | ×1 |
| Chisel flap | 420 × 90 mm | ×1 |
| Tie strap | 480 × 20 mm | ×1 |
| Tie anchor | 40 × 25 mm | ×1 |
Bench sequence 4 mm · 0.8 mm waxed polyester, brown
Pocket widths follow tine count, not a guess
A 2-tooth iron is about 14 mm across, a 6-tooth about 34 mm, a 10-tooth about 54 mm. Cut pockets at those widths plus 3 mm, and stagger the pocket heights: the tall pockets for the long irons at one end, the short ones at the other. Fifteen pockets across 420 mm works out to an average of 28 mm per pocket, which fits a 2, 6 and 10-tooth iron set plus a couple of awls.
Sew the pockets as one continuous line of vertical seams rather than fifteen separate pieces. Mark the pitch across the full 420 mm strip with a wing divider, then stitch each divider down at 4.0 mm pitch, backstitching two stitches at the top of each. Fifteen pockets take about 2.5 hours on a pony.
Rivets where the roll bends
The roll folds at 65 mm from the bottom to form the pocket floor. That fold carries the weight of the whole set, so it gets four rivets at 90 mm centres rather than stitches alone. Stitches alone at a 6/7 oz fold will pull through within two years of daily use; the rivets take the load and the stitches keep the layers aligned.
Punch the rivet holes before you fold, with the layers clamped. Punching after the fold lets the layers shift by a millimetre or two, and a rivet that goes in on a slant will work loose in a month.
The flap, the studs and the tie
The flap is a separate 420 × 90 mm piece stitched to the back of the body and folded over the top. It closes with two Sam Browne studs through 6 mm holes punched 12 mm in from the flap corners. Sam Browne studs are the right choice here because the flap opens and closes daily and a snap would wear a shiny spot into the leather where it rubs.
The 480 mm tie strap wraps twice around the rolled bundle and closes on a 20 mm line snap. Measure the tie on the roll when it is loaded with tools, not empty — fifteen chisels add about 35 mm to the rolled diameter, and a tie cut on an empty roll will not reach.
Edges and the first loading
Bevel and burnish all edges, but do not paint them. A tool roll lives in a bag, gets dropped on benches and dragged across floors; edge paint chips under that treatment and looks worse than a plain burnished edge that just darkens with use.
Load the pockets with your actual tools on the day you finish it, then leave the roll closed and tied for two days. The pockets will take a permanent set around the tine shanks, and after that the tools slide in and out without stretching the leather.
Also filed under Workshop Gear
Bags & Pouches · 2026-10-14
A Boxed Dopp Kit: Five Panels, Four Corners, Two Hands
A dopp kit is the first order where you build a three-dimensional object rather than a folded one.
- Bench hours
- 14 h
- Level
- Bench lead
Cases & Covers · 2026-10-09
Wet-Moulded Axe Sheath With a Stitched Welt
The one rule of an axe sheath is that the blade must never touch the stitch line.
- Bench hours
- 9 h
- Level
- Bench lead
Kit profiles
Adhesives
Adhesives: Contact Cement, Open Time and the Ventilation Rule
Contact cement is the strongest and the most misused adhesive on this bench.
- Rows filed
- 5
Blades
Cutting Tools: What Each Blade Is Actually For
Most bench injuries come from using the wrong blade on the wrong cut.
- Rows filed
- 5
-
- Rows filed
- 4