Cases & Covers · Bench lead · 9 Bench hours · 3 min read
Wet-Moulded Axe Sheath With a Stitched Welt
The one rule of an axe sheath is that the blade must never touch the stitch line. That is what the welt is for: a strip of 8/9 oz leather sandwiched between the panels, so the cutting edge sits against leather that is not holding the seam together. Nine hours, three panels, and a moulding step you cannot rush.
Materials
- Veg-tan shoulder8/9 oz, 0.09 m²
- Welt cord4 mm nylon, 300 mm
- Waxed thread1.0 mm natural, about 8 m
Tools
- Wet moulding formthe axe head itself, wrapped in film
- Pricking irons4.0 mm, 2 + 6 tooth
- Awlfor opening holes through the welt stack
- Bone folderfor pressing the mould
Bench hours
- 9 hBench lead
- 4 mmStitch pitch
- 1.0 mm waxed polyester, naturalThread
- Vegetable-tanned cowhide, 8/9 oz, wet-moulded to the bitHide
- 8/9 oz (3.2–3.6 mm)Thickness
- Hardware
- 3 parts
- Cut list
- 4 pieces
- Published
- 2026-10-09
- Stitch pitch
- 4 mm
Cut list Hole array drawn from the spacing in the spec table; dimensions in millimetres.
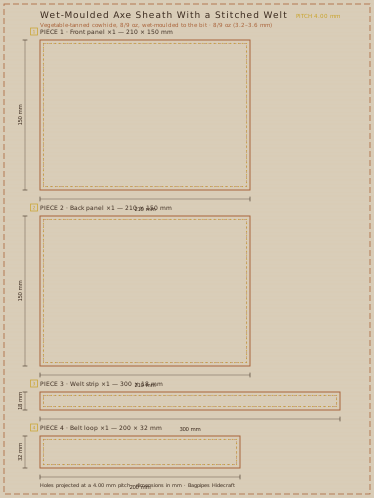
| Piece | Size (mm) | Qty |
|---|---|---|
| Front panel | 210 × 150 mm | ×1 |
| Back panel | 210 × 150 mm | ×1 |
| Welt strip | 300 × 18 mm | ×1 |
| Belt loop | 200 × 32 mm | ×1 |
Bench sequence 4 mm · 1.0 mm waxed polyester, natural
The welt, and why 18 mm is the number
The welt strip is 300 × 18 mm. It runs around the bit from the heel to the toe, sandwiched between the front and back panels, with the stitches passing through all three layers. Eighteen millimetres is the minimum that keeps the stitch line far enough from the edge that a freshly sharpened axe cannot reach it; a 12 mm welt works until someone resharpens the blade and then it is a cut seam.
Put a 4 mm nylon cord inside the welt fold before it goes between the panels. The cord stops the wet leather from collapsing the welt flat while it dries and gives the sheath the rounded edge that stops the blade from catching as it goes in.
Mould the sheath around the head, not around a drawing
Wrap the axe head in cling film and case the two panels until they take a thumbprint. Lay the head on the back panel, bring the front panel over, and press the leather down around the cheek and the toe with a bone folder. Work the leather down into the corners of the bit with your thumbs — those corners are the only part of the sheath that must be tight.
The sheath should be moulded with the head in place, then held on the form while it dries for at least six hours. A sheath moulded around a tracing of the head comes out 3 to 5 mm oversized at the cheek, and an oversized sheath lets the head slide and dull itself on the welt.
Stitch through three layers with a pony
Once dry, mark the stitch line 4.5 mm from the edge and run the irons through all three layers. That is 12 mm of leather — too much for a single pass. Run the irons on one panel first, then use those holes as a guide and drill the stack with an awl, checking after every hole that the awl comes out on the marked line on the far side.
Saddle stitch with 1.0 mm thread and two size 001 needles, keeping the tension even. On a three-layer seam, uneven tension shows immediately as a wavy line on one face. Backstitch two stitches at the heel end only — the toe end gets a rivet instead, because a rivet cannot come undone at the point where the blade pressure is highest.
Belt loop, finish and the sharpening caveat
The 200 × 32 mm belt loop folds over the sheath back and is riveted at both ends with 12 mm brass rivets. Rivet it through the back panel only — through both panels and you will hit the welt channel. Two rivets, one at each end, is enough; a loop riveted in the middle will crack at the middle rivet within a year of hard use.
Finish with a coat of acrylic on the outside and a light gum burnish everywhere else. Then check the sheath with the axe in place: the blade should touch the welt, never the stitches. If it touches the stitches, cut the seam, add 6 mm to the welt, and re-stitch. This is the one order on the bench where I will unpick three hours of work rather than hand it over.
Also filed under Cases & Covers
Cases & Covers · 2026-09-26
Passport Cover With Two Card Wings and a Ticket Flap
A passport is 125 × 88 mm when closed and 125 × 176 mm when open, which is exactly why most covers are made too tight.
- Bench hours
- 5 h
- Level
- Working bench
Kit profiles
Adhesives
Adhesives: Contact Cement, Open Time and the Ventilation Rule
Contact cement is the strongest and the most misused adhesive on this bench.
- Rows filed
- 5
Blades
Cutting Tools: What Each Blade Is Actually For
Most bench injuries come from using the wrong blade on the wrong cut.
- Rows filed
- 5
-
- Rows filed
- 4