Belts & Straps · Starter bench · 4 Bench hours · 3 min read
A 38 mm Single-Prong Belt That Starts as a Straight Blank
The plain belt is the cheapest way to learn the three skills every later order depends on: cutting a strap dead straight, holding a constant distance from the edge, and setting hardware without splitting the hide. This is the order I put in front of a new bench hand — a 1180 mm blank, five holes at 25 mm centres, one buckle fold, four rivets. Four hours and roughly 0.11 m² of 8/9 oz shoulder.
Materials
- Veg-tan shoulder8/9 oz, blank 1180 × 38 mm
- Waxed polyester thread0.8 mm natural, about 4 m
- Gum tragacanth or edge paint2 coats per edge
- Brass buckle set38 mm roller, 2 keepers, rivets
Tools
- Strap cutterfence set to 38 mm
- Pricking irons4.0 mm, 2-tooth + 6-tooth
- Edge beveler#2, 1.2 mm
- Riveter and steel anvil9 mm burr setter
- Drive punch4.5 mm
Bench hours
- 4 hStarter bench
- 4 mmStitch pitch
- 0.8 mm waxed polyester, naturalThread
- Vegetable-tanned cowhide shoulder, B-grade, 2.2 m²Hide
- 8/9 oz (3.2–3.6 mm)Thickness
- Hardware
- 4 parts
- Cut list
- 3 pieces
- Published
- 2026-08-28
- Stitch pitch
- 4 mm
Cut list Hole array drawn from the spacing in the spec table; dimensions in millimetres.
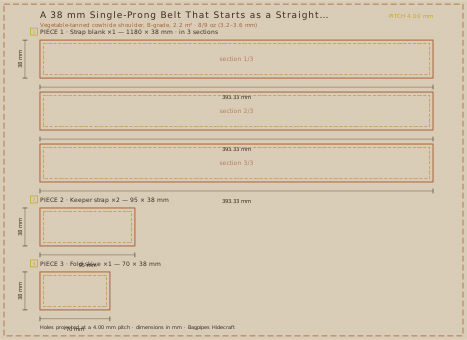
| Piece | Size (mm) | Qty |
|---|---|---|
| Strap blank | 1180 × 38 mm | ×1 |
| Keeper strap | 95 × 38 mm | ×2 |
| Fold skive | 70 × 38 mm | ×1 |
Bench sequence 4 mm · 0.8 mm waxed polyester, natural
Take the three measurements that matter
Do not start from your trouser waist size. Take the belt you actually wear, lay it flat, and measure from the fold at the buckle to the hole you use most often. That is your centre hole, and everything else is offset from it: five holes at 25 mm centres gives 100 mm of adjustment, enough for a body that moves three kilos either way. Most adult sizes land between 1060 mm and 1170 mm to that centre hole.
Then fix the tail. Add 100 mm from the centre hole to the tip, and taper the last 90 mm from 38 mm down to 25 mm. A blunt 38 mm end looks unfinished and drags on belt loops; a taper that begins 90 mm out rolls past them cleanly. Write the three numbers — centre hole, total length, taper start — on the flesh side in pencil before the knife comes out.
Cut oversize, then trim to the line
A strap cutter set to 38 mm does the whole blank in one pull, but only if the hide is flat and the fence runs along a factory edge. Cutting freehand with a head knife or a utility blade, clamp a one-metre steel rule and take three light passes rather than one heavy one. A single deep pass follows the grain and can wander 2 mm over a metre, which is the difference between a belt and a banana.
So cut 3 mm over width first. Then true the second edge against the first: measure 38 mm from the clean edge every 200 mm, join the marks with a rule, and trim. Cutting oversize and trimming to the line costs five minutes and saves the blank. Square both ends too — 1 mm of skew across 1180 mm is invisible on the bench and very obvious around a waist.
Edge, fold and burnish
Run a #2 beveler down both long edges and both ends, then sand 400 grit followed by 800. Two coats of gum tragacanth rubbed hard with canvas until the edge goes glassy and dark is the traditional finish. If you prefer a painted edge, use a roller pen and two thin coats of edge paint, twenty minutes apart. Do not combine the two finishes — paint laid over tragacanth flakes at the first bend.
The fold comes next. Skive the last 70 mm on the flesh side from full thickness down to about 1.2 mm, dampen the fold line with a sponge, and fold it over the buckle bar. That skive is what stops the fold from bulging into a hard lump behind the buckle. Clamp it, let it dry for an hour, then punch the two rivet holes 12 mm and 32 mm behind the fold.
Holes, rivets and the five-minute check
Punch the five adjustment holes with a 4.5 mm drive punch at 25 mm centres, starting from the centre hole. Punch from the grain side onto a nylon block. A dull punch leaves a torn rim, and a torn rim cracks within a season. For the buckle, either cut a 40 mm oval slot so the buckle can be swapped, or fix it with two burr rivets if it never needs to come off.
Set the four rivets with a burr setter on a steel anvil: three light taps rather than one hard one, checking after each that the burr has rolled instead of crushing the hide. Before the belt leaves the bench, burnish the hole rims by hand and flex the whole strap through your fist in both directions. If the grain creases white anywhere, the fold skive was too abrupt — the belt is still wearable, but note it for the next one.
Also filed under Belts & Straps
Belts & Straps · 2026-10-03
A Padded Dog Collar Built From Two Layers
A collar takes more load than any belt on this bench.
- Bench hours
- 6 h
- Level
- Working bench
Belts & Straps · 2026-09-18
A Hand-Stitched Watch Strap at 3.0 mm Pitch
A watch strap is the smallest object on this bench and the least forgiving.
- Bench hours
- 6 h
- Level
- Working bench
Belts & Straps · 2026-10-03
A Padded Dog Collar Built From Two Layers
A collar takes more load than any belt on this bench.
- Bench hours
- 6 h
- Level
- Working bench
Cases & Covers · 2026-09-26
Passport Cover With Two Card Wings and a Ticket Flap
A passport is 125 × 88 mm when closed and 125 × 176 mm when open, which is exactly why most covers are made too tight.
- Bench hours
- 5 h
- Level
- Working bench
Kit profiles
Adhesives
Adhesives: Contact Cement, Open Time and the Ventilation Rule
Contact cement is the strongest and the most misused adhesive on this bench.
- Rows filed
- 5
Blades
Cutting Tools: What Each Blade Is Actually For
Most bench injuries come from using the wrong blade on the wrong cut.
- Rows filed
- 5
-
- Rows filed
- 4