Belts & Straps · Working bench · 6 Bench hours · 3 min read
A Padded Dog Collar Built From Two Layers
A collar takes more load than any belt on this bench. A 30 kg dog lunging at the end of a lead puts a shock load through the collar that is several times its own weight, and it does it hundreds of times a week. The answer is not thicker leather — it is two layers bonded and stitched so the load never falls on a single rivet. Six hours for a 30 to 46 cm neck.
Materials
- Veg-tan shoulder8/9 oz, 520 × 32 mm
- Soft lining3/4 oz, 520 × 30 mm
- Waxed polyester thread1.0 mm natural, about 7 m
Tools
- Pricking irons4.0 mm, 2 + 6 tooth
- Oval punch25 × 5 mm slots for the buckle tongue
- Contact cementfor bonding the lining
- Edge beveler#2, 1.2 mm
Bench hours
- 6 hWorking bench
- 4 mmStitch pitch
- 1.0 mm waxed polyester, naturalThread
- Vegetable-tanned cowhide, 8/9 oz body with a 3/4 oz liningHide
- 8/9 oz body (3.2–3.6 mm), 3/4 oz lining (1.2 mm)Thickness
- Hardware
- 4 parts
- Cut list
- 3 pieces
- Published
- 2026-10-03
- Stitch pitch
- 4 mm
Cut list Hole array drawn from the spacing in the spec table; dimensions in millimetres.
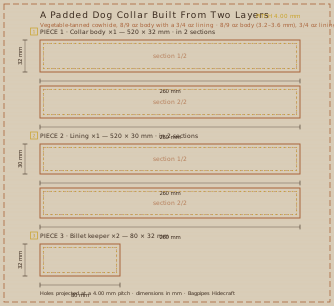
| Piece | Size (mm) | Qty |
|---|---|---|
| Collar body | 520 × 32 mm | ×1 |
| Lining | 520 × 30 mm | ×1 |
| Billet keeper | 80 × 32 mm | ×2 |
Bench sequence 4 mm · 1.0 mm waxed polyester, natural
Two layers, bonded then stitched
Take an 8/9 oz body and a 3/4 oz lining. The body carries the load; the lining is what stops the collar from rubbing the coat bald at the throat. Bond them with contact cement applied to both faces, left to go tacky for 10 minutes, then pressed from the centre outwards with a roller so no air is trapped.
Now the lining is doing a second job: it doubles the thickness of leather the rivets have to pass through. A 9 mm burr rivet through 4.8 mm of leather holds roughly twice what the same rivet holds through 3.6 mm. That single change is why this collar can use rivets at the D-ring instead of a bar-tacked seam.
Size from neck plus five centimetres
Measure the neck at the narrowest point and add 50 mm. A 40 cm neck gives a 450 mm collar, which with five buckle slots at 25 mm centres covers 370 mm to 470 mm — enough adjustment for a young dog that is still filling out.
Punch five 25 × 5 mm oval slots, not round holes. Round holes at 4.0 mm pitch wear into ovals within a year anyway; starting with an oval spreads the load across the leather instead of on two points. The buckle tongue and the middle slot should take the wear, and there should be two slots either side of the one in use.
The D-ring sits on a folded loop, never on a rivet
The D-ring goes through a 60 mm fold of the collar body, stitched with a double row of 1.0 mm thread at 4.0 mm pitch on both sides of the ring. The rivets hold the fold shut; they do not carry the lead. A D-ring riveted flat to a single thickness of collar is the most common failure in homemade collars, and it fails at the worst possible moment.
Set the two keepers 15 mm either side of the buckle so the strap tail is held flat and cannot be chewed. Keepers are stitched and riveted — a stitched-only keeper on a collar lasts about a year of a dog that scratches.
Edges, and a word about the first week
Bevel both the body and the lining edges, sand at 400, and burnish with gum. Do not paint the edges of a collar: dogs chew, and cured edge paint flakes off into the mouth. A burnished wax edge is safe and re-burnishes itself with wear.
Check the collar twice in the first week and once a month after that. Look at the slots, the keeper stitches and the D-ring fold. Ten seconds with a thumbnail along the stitch line tells you more than a visual inspection — any stitch that has loosened will lift.
Also filed under Belts & Straps
Belts & Straps · 2026-09-18
A Hand-Stitched Watch Strap at 3.0 mm Pitch
A watch strap is the smallest object on this bench and the least forgiving.
- Bench hours
- 6 h
- Level
- Working bench
Belts & Straps · 2026-08-28
A 38 mm Single-Prong Belt That Starts as a Straight Blank
The plain belt is the cheapest way to learn the three skills every later order depends on: cutting a strap dead straight, holding a constant distance from the edge, and setting hardware without splitting the hide.
- Bench hours
- 4 h
- Level
- Starter bench
Bags & Pouches · 2026-10-14
A Boxed Dopp Kit: Five Panels, Four Corners, Two Hands
A dopp kit is the first order where you build a three-dimensional object rather than a folded one.
- Bench hours
- 14 h
- Level
- Bench lead
Cases & Covers · 2026-10-09
Wet-Moulded Axe Sheath With a Stitched Welt
The one rule of an axe sheath is that the blade must never touch the stitch line.
- Bench hours
- 9 h
- Level
- Bench lead
Kit profiles
Adhesives
Adhesives: Contact Cement, Open Time and the Ventilation Rule
Contact cement is the strongest and the most misused adhesive on this bench.
- Rows filed
- 5
Blades
Cutting Tools: What Each Blade Is Actually For
Most bench injuries come from using the wrong blade on the wrong cut.
- Rows filed
- 5
-
- Rows filed
- 4